Dental X-Ray Reading Guide: How to Understand Your Own Dental X-Rays
The five types of dental X-rays, what each shows, the systematic way a dentist reads them, and every common finding with an annotated example — so you can understand what your dentist is actually looking at.
Why Dental X-Rays Are the Foundation of Every Diagnosis
Every dental treatment recommendation — a filling, a crown, a root canal, an extraction, an implant — rests on the interpretation of a dental X-ray. If the X-ray is misread, every recommendation that follows is built on the wrong foundation.
The catch is that X-ray interpretation is also the most subjective part of dentistry. The American Dental Association and the American Academy of Oral and Maxillofacial Radiology both stress that imaging must be interpreted in context — your symptoms, your history, the rest of your mouth — not in isolation. Two qualified dentists looking at the same image can legitimately reach different conclusions about what it shows and what it warrants.
That subjectivity is exactly why understanding your own X-rays is worth your time. You do not need to become a dentist. You do need to be able to look at the image your dentist points at and have some idea what you are looking at — enough to ask the right questions, to know when a finding is clearly visible and when it is being inferred, and to recognize the radiographic features behind a diagnosis.
This guide is built around what a dentist actually does when reading your X-rays. Each section explains one category of finding with an annotated example. By the end you should be able to look at a bitewing or a periapical and identify the basic features any competent reader would call out.
The Five Types of Dental X-Rays
Each type of dental X-ray shows different anatomy from a different angle. Knowing which type you are looking at is the first step in reading it.
Bitewing
The most common posterior X-ray. A bitewing captures the crowns of upper and lower posterior teeth in a single image, with the patient biting on a tab between exposures. It is the best view for detecting interproximal caries (cavities between adjacent teeth) and for screening early crestal bone loss between back teeth. Standard practice is one to four bitewing exposures depending on the patient.
Periapical (PA)
A periapical X-ray shows one to three adjacent teeth from the crown all the way to the root apex and a few millimeters of surrounding bone. It is essential for evaluating any tooth with suspected periapical pathology, for endodontic diagnosis and follow-up, and for evaluating root morphology before extraction or implant planning. A full mouth series (FMX) is typically 14 to 20 periapicals plus bitewings. The annotated periapical examples later in this guide show typical periapical pathology — periradicular radiolucencies and apical bone changes.
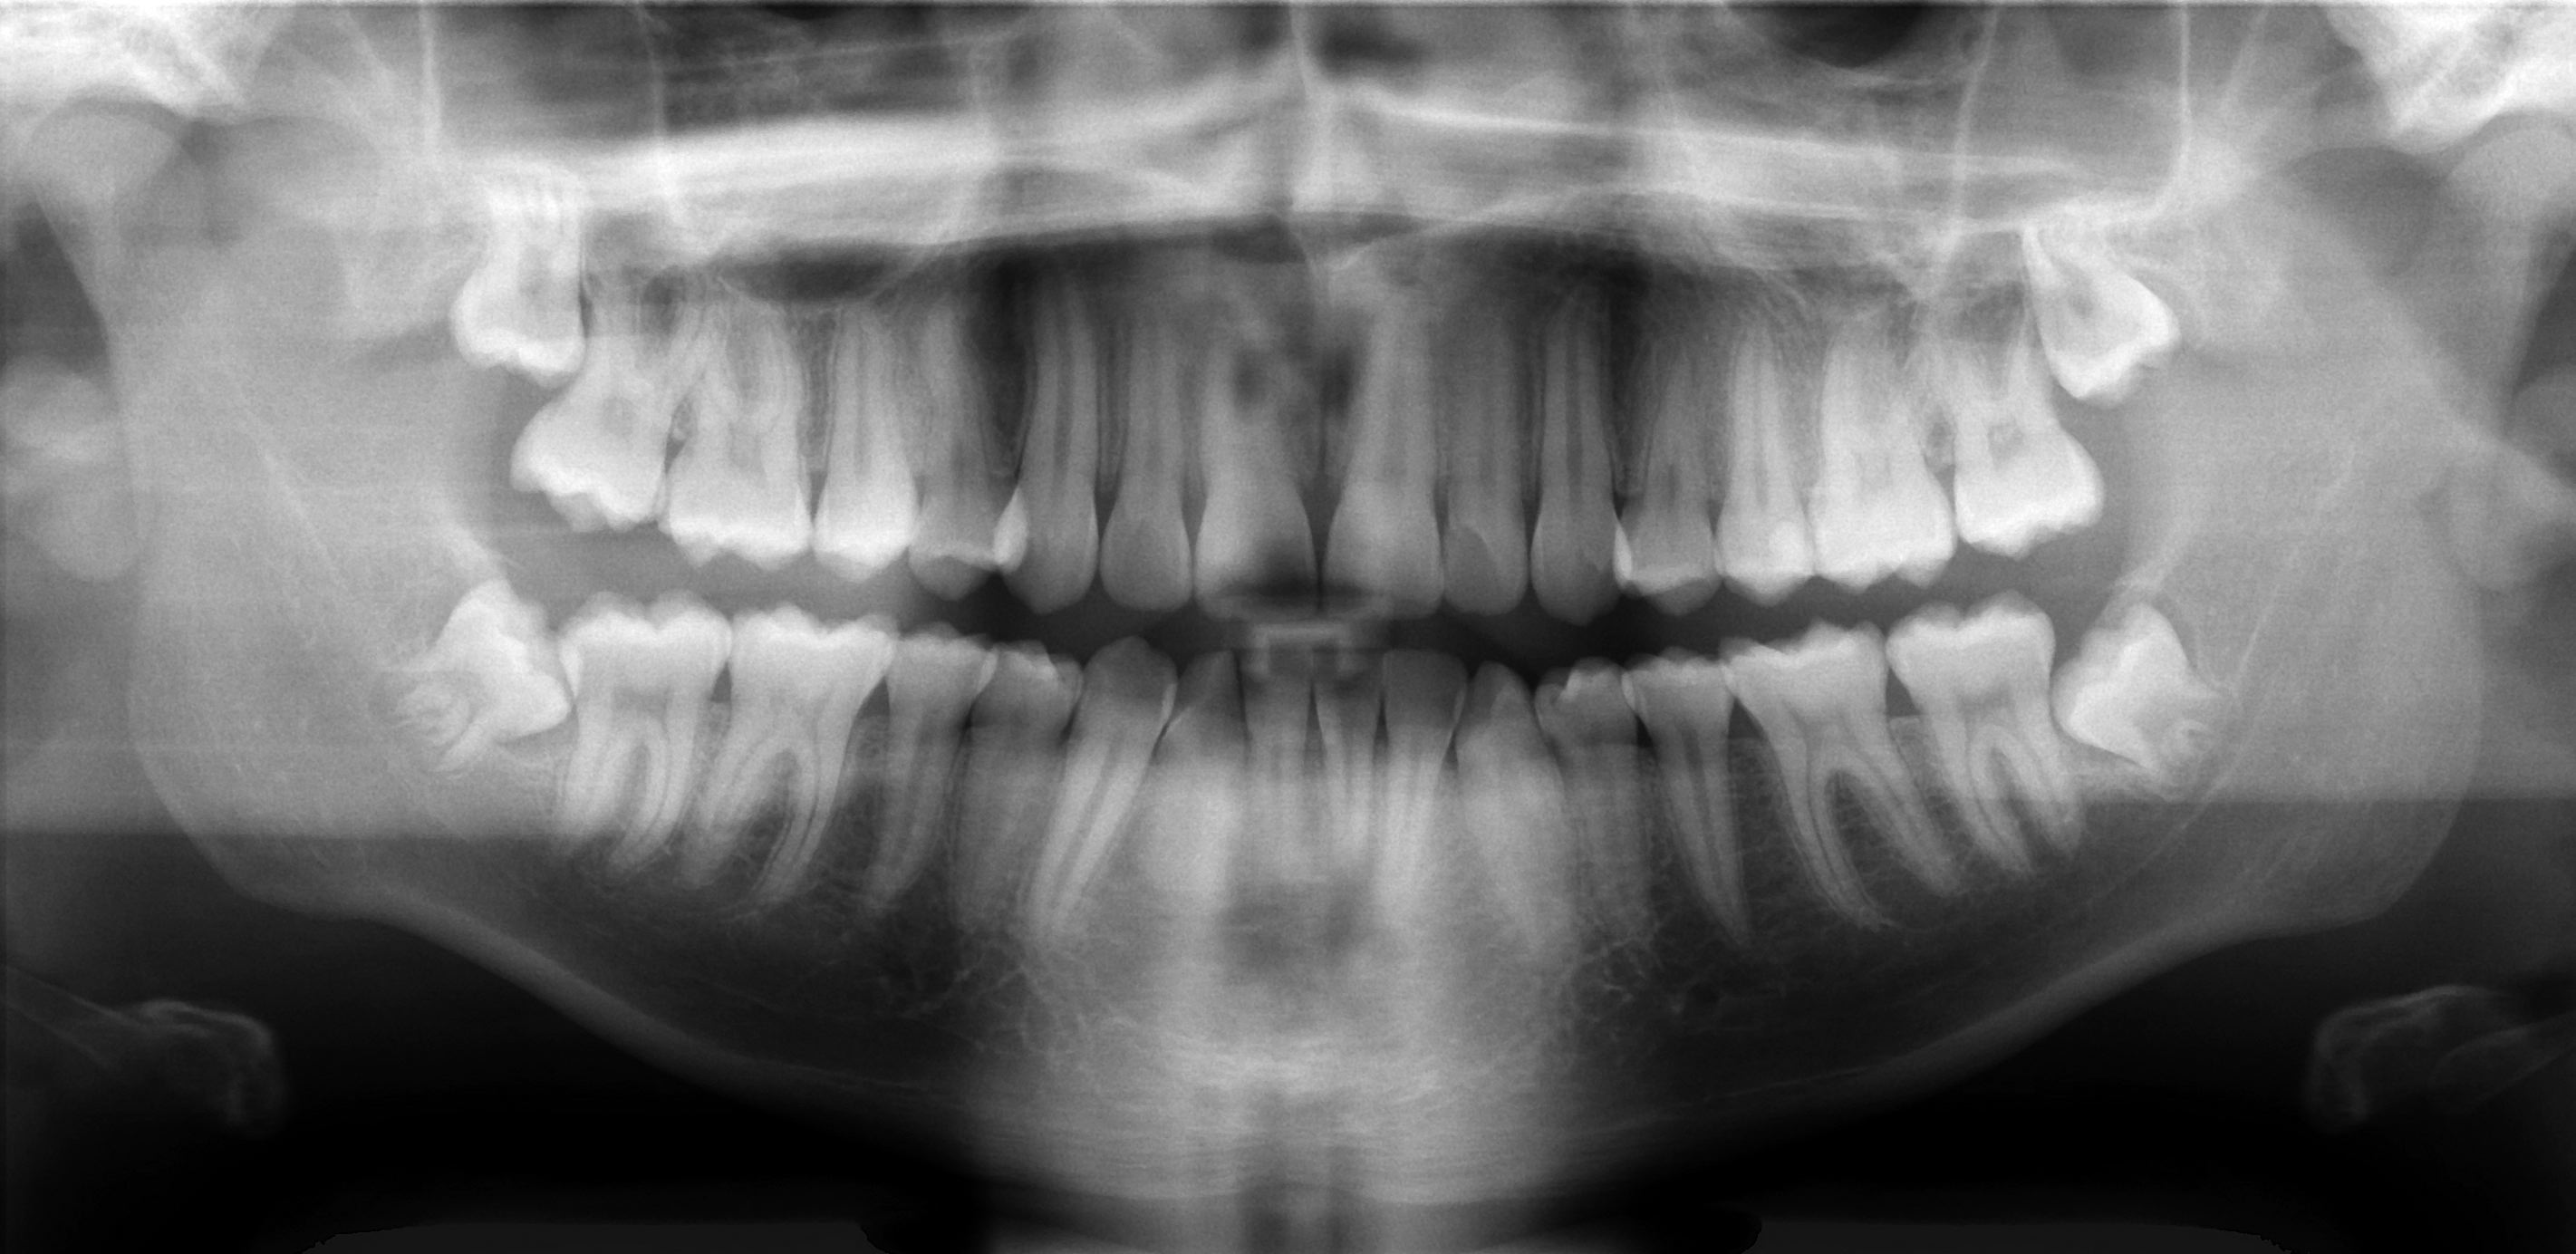
Panoramic (OPG)
A panoramic radiograph is a single curved image showing both jaws, all teeth, the maxillary sinuses, the temporomandibular joints, and the inferior alveolar nerve canal. It is the standard pre-operative view for wisdom tooth assessment, broad screening, and an overview of dental development in children and adolescents. A panoramic image has lower resolution than an intraoral X-ray and is not a substitute for bitewings or periapicals when fine detail is needed.
Occlusal
An occlusal X-ray shows the floor or roof of the mouth from above or below. It is most commonly used in children to evaluate supernumerary teeth, in cases of suspected jaw fractures, and to localize impacted canines or pathology in the palate or floor of mouth. Less common in routine adult dentistry than the other view types.
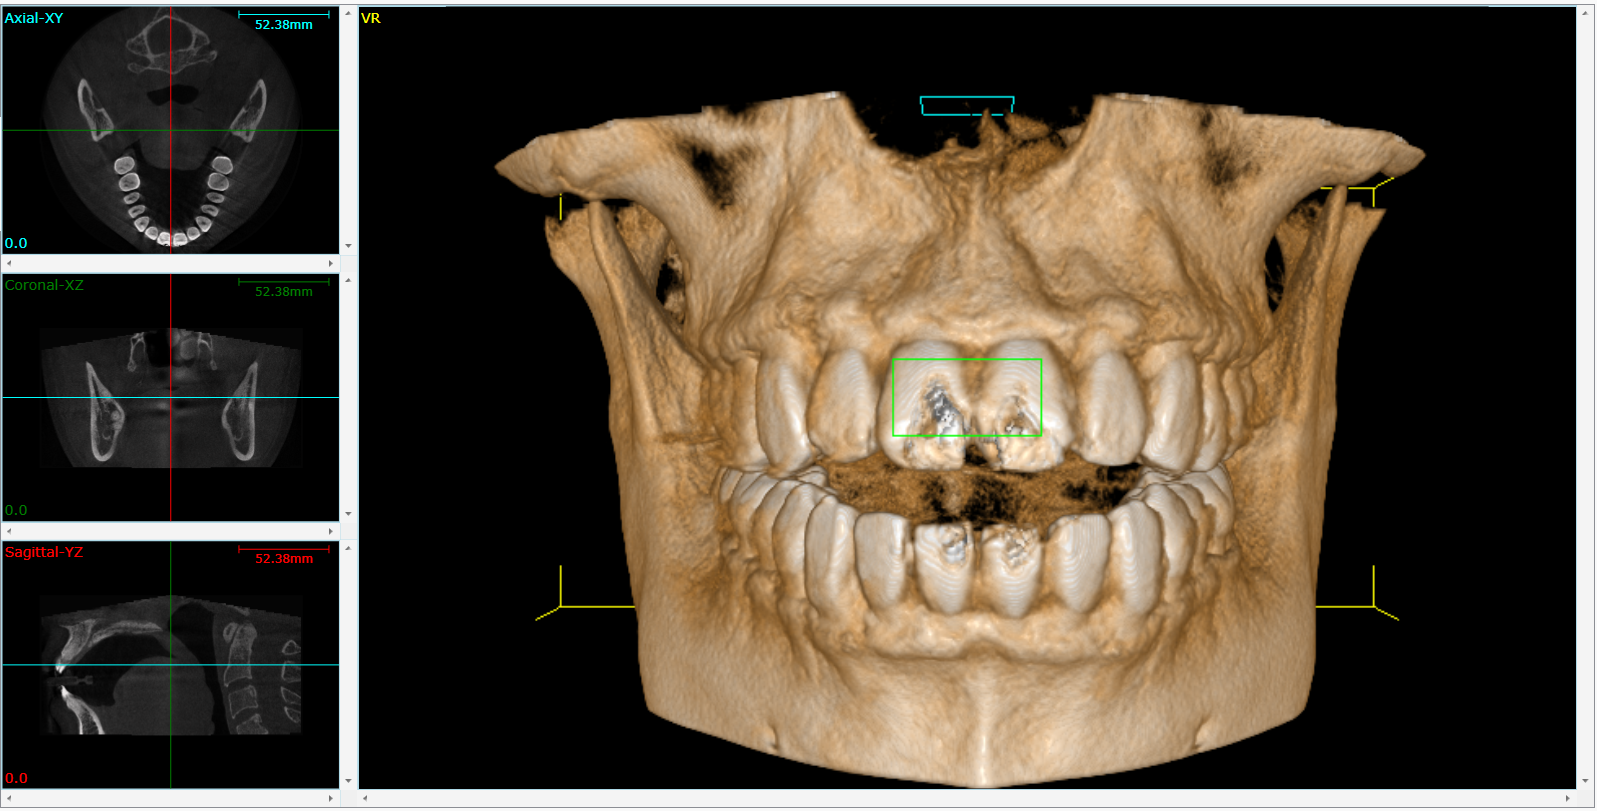
Cone Beam CT (CBCT)
A CBCT scan is a 3D imaging modality that produces a volume of the jaws and teeth. Reviewed by indication, not as a routine screen — the radiation dose is higher than a conventional X-ray and the AAOMR has specific guidance on when CBCT is appropriate. Standard indications include implant planning, suspected vertical root fractures, complex endodontic anatomy, impacted teeth in close proximity to the inferior alveolar nerve, and pathology beyond what 2D imaging can resolve.
The Systematic Reading Protocol
A trained reader does not just glance at an X-ray and call out the most obvious finding. They work through the image in a fixed sequence, every time, so subtle findings do not get missed by attention drifting toward the dramatic one. Here is the seven-step sequence used in our reviews.
1. Image quality check
Is the X-ray diagnostic? Correct contrast, no severe cone-cuts, no major distortion. If the image quality is inadequate to make a call, that itself is the finding — and the next step is requesting better imaging.
2. Anatomic orientation
Confirm which side and which teeth are in view. Identify normal anatomic landmarks — mental foramen, maxillary sinus floor, mandibular canal, mental ridge — so they are not misread as pathology.
3. Caries screen
Scan every interproximal contact and every occlusal surface for radiolucent zones. Note depth: enamel-only, into dentin (outer third, middle third, inner third), or pulp involvement.
4. Periodontal assessment
Measure CEJ-to-bone-crest distance at each interproximal site. Horizontal or vertical pattern. Furcation involvement. Calculus deposits visible as radiopaque spurs on the root surface.
5. Periapical assessment
Examine the bone at each root apex. Widened PDL space, periapical radiolucency, condensing osteitis. Track any sinus path or fistula.
6. Root and pulp morphology
Number of canals visible. Calcification of the pulp chamber. Internal or external resorption. Curvature and length of each root. Signs of fracture.
7. Restorations and incidental findings
Margins of every existing filling and crown. Posts and cores. Implants and their osseointegration. Retained root tips, cysts, soft-tissue opacities, sinus floor pathology, anatomic variants.
The discipline of the sequence matters more than the speed. A reader who works through all seven steps on every image catches findings that a reader who jumps straight to the chief complaint will miss.
Identifying Caries (Cavities) on X-Rays
Dental caries appear as radiolucent (dark) zones on X-rays because demineralized tooth structure absorbs less X-ray energy than healthy enamel and dentin. The International Caries Detection and Assessment System (ICDAS) provides a standardized framework that combines radiographic and clinical features into a depth-staged classification — and this is what trained readers use to decide whether a finding warrants restoration, monitoring, or remineralization.
Where Caries Appear on the Image
There are three main patterns to look for:
- Interproximal caries: triangular radiolucencies between adjacent teeth, with the wide base on the outer enamel surface and the apex pointing toward the pulp.
- Occlusal caries: radiolucent shadows beneath the chewing surface enamel, often wider beneath than the visible defect above suggests. Harder to detect on X-rays alone — clinical exam and sometimes laser fluorescence are needed.
- Recurrent (secondary) caries: dark zones at the margin of an existing filling or crown. Easy to miss because the eye is drawn to the bright restoration rather than the subtle dark margin.
Depth Determines Management
Once a lesion is identified, depth of penetration determines what to do about it:
- Outer enamel only: often monitored, especially in low-risk patients
- Inner enamel / DEJ (dentinoenamel junction): may be monitored or restored depending on patient risk and clinical findings
- Outer dentin (outer third): usually restored
- Middle or inner dentin: restored; consider pulp protection
- Pulp involvement: root canal or extraction territory
For a deeper breakdown of when a cavity actually needs a filling versus when it can be safely watched, see our guide on do I really need a filling and on what to do when multiple cavities are found at once.
Periodontal Bone Loss
The hallmark radiographic finding of periodontal disease is bone loss. The reference point on every X-ray is the cemento-enamel junction (CEJ) — the line where the enamel crown meets the cementum-covered root. In a healthy mouth, the bone crest sits 1–2 mm below the CEJ. When the distance is greater, bone has been lost.
The American Academy of Periodontology 2018 staging and grading classification combines bone loss severity, pattern, rate, and risk factors into a single periodontitis stage (I–IV) and grade (A–C). Bone loss is one input, but it is the most reliable radiographic signal.
Patterns of Bone Loss
- Horizontal: bone loss running roughly parallel to the CEJ line across multiple teeth. The most common pattern and represents generalized periodontal disease.
- Vertical (angular): a localized defect running down one side of a tooth root, often deeper than the surrounding bone loss. Associated with more aggressive disease and may need surgical regenerative treatment.
- Furcation involvement: on multi-rooted teeth, bone loss extending into the space between the roots. Visible on a 2D X-ray usually indicates a Class II or III defect; Class I is typically below radiographic resolution.
Bone loss findings are often the trigger for a recommendation of scaling and root planing (deep cleaning). For a breakdown of when SRP is and is not warranted, see do I really need a deep cleaning.
Periapical Findings
Pathology around the root tip — the periapex — is the strongest indicator that a tooth has lost vitality or is failing endodontically. The American Association of Endodontists uses a standardized terminology for what is seen here, and the Periapical Index (PAI) is the most commonly cited grading system for periapical lesions.
Periapical Radiolucency
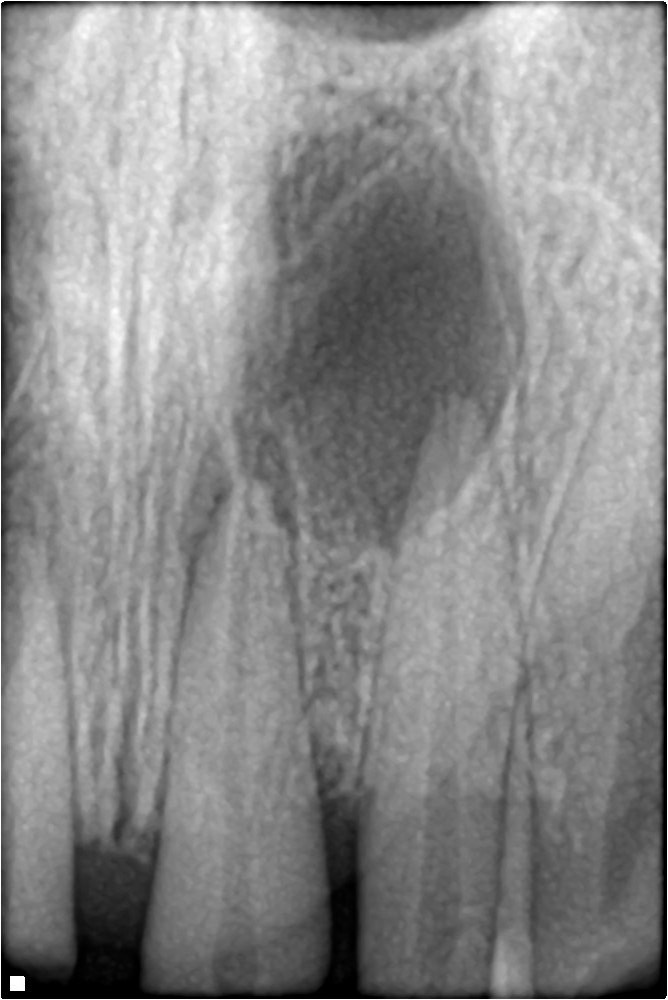
A dark zone around the root apex usually represents pulpal necrosis with surrounding bone resorption. The size, shape, and clarity of the border carry diagnostic weight: a well-defined corticated lesion is more chronic; an ill-defined diffuse lesion is more acute. The case below shows periradicular radiolucency at the apices of two anterior teeth — active infection eating bone from beneath the roots.
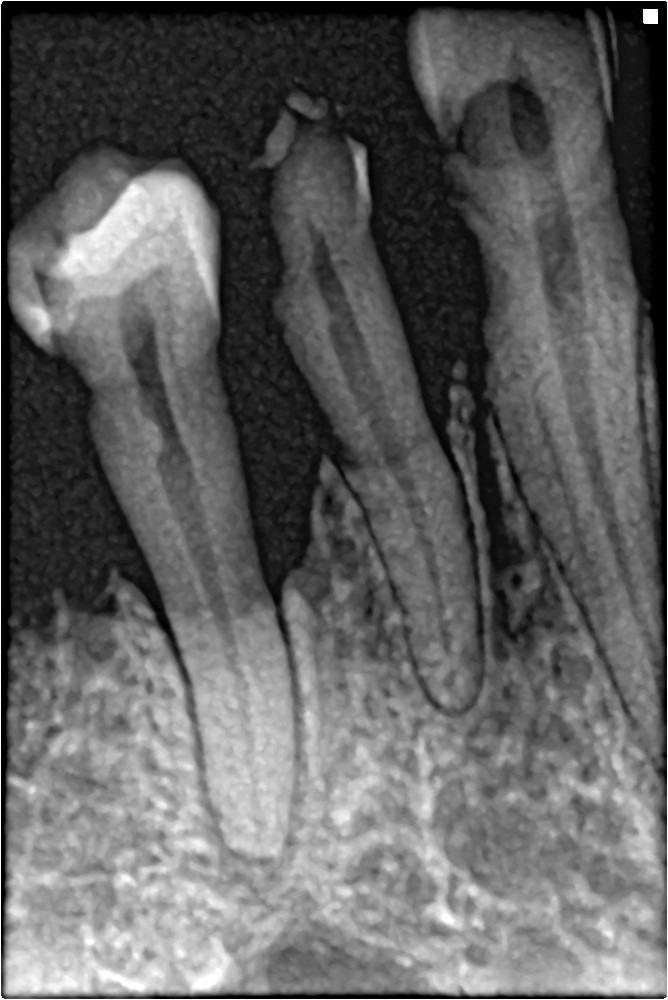
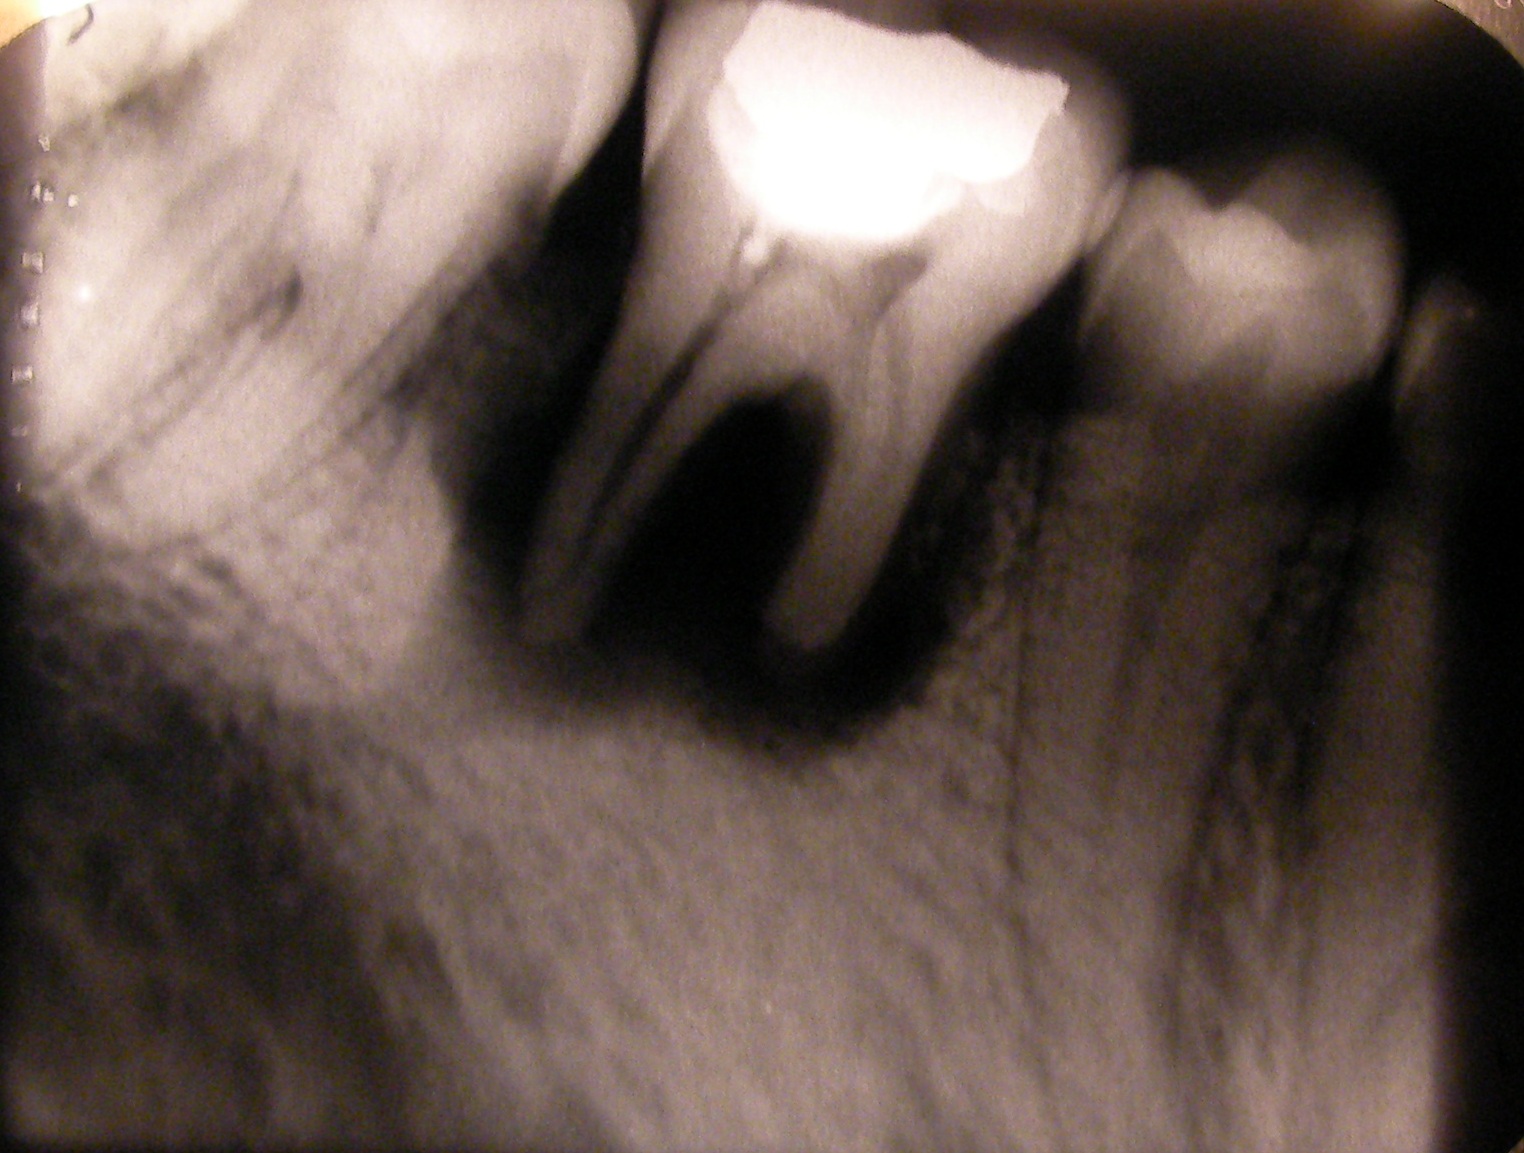
Periapical Abscess
When the periapical infection is acute or has produced a localized collection of pus, the radiographic appearance is a well-defined dark zone wrapping each affected root — sometimes both roots of a multi-rooted tooth simultaneously, as in the case below on a lower first molar. The size of the radiolucency does not necessarily correlate with symptom severity; large chronic abscesses can be entirely asymptomatic until they flare.

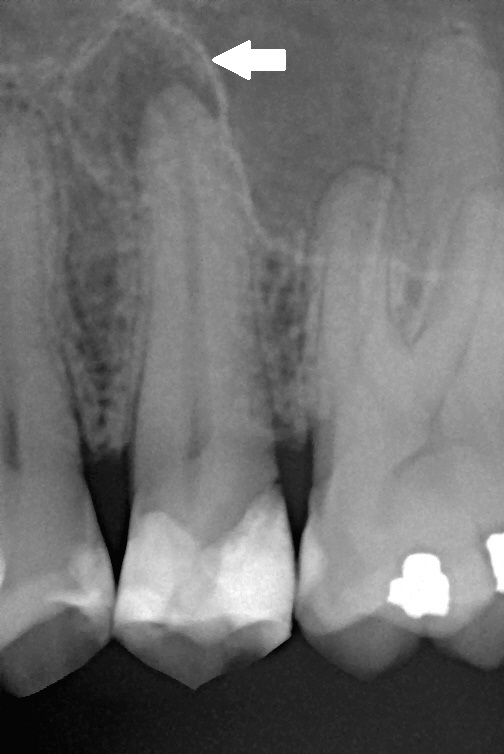
Chronic Apical Periodontitis
The same biological process viewed over time: a long-standing inflammatory response to a non-vital pulp, producing a localized periapical radiolucency that may have been present for months or years before being picked up. The example below shows a second premolar with the classic apical lesion (arrow). Many of these are first noticed on a routine X-ray when the tooth itself is asymptomatic.
Widened PDL Space
The periodontal ligament space is the thin radiolucent line between the root and surrounding bone. A widened PDL at the apex is one of the earliest signs of periapical pathology — it appears before a full radiolucency develops and is easy to miss on a casual read.
For a deeper look at when a root canal is and is not warranted from these findings, see do I really need a root canal.
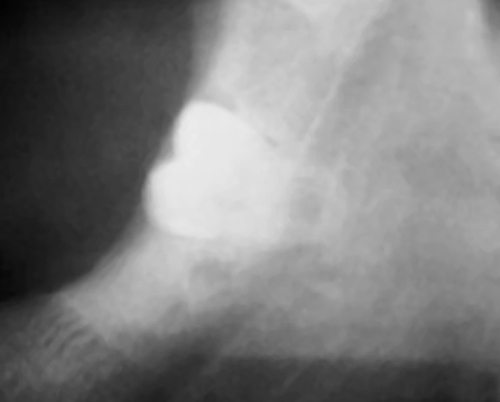
Root Resorption
Resorption is the progressive loss of root structure — either from outside the tooth inward (external) or from inside the pulp canal outward (internal). It is one of the more commonly missed findings on a quick read, because the lesion can look like normal anatomy at first glance.
On the radiograph, look for an irregular contour to the root surface where there should be a smooth one. The pulp canal outline is the key distinguisher: in external resorption it typically passes through or near the defect undisturbed; in internal resorption the canal expands into the lesion and the canal outline is lost. External cervical resorption is often associated with previous trauma, orthodontic treatment, or internal bleaching; internal resorption is usually triggered by chronic pulpal inflammation.
Impactions and Unerupted Teeth
Impacted teeth — most commonly third molars (wisdom teeth) and maxillary canines — are evaluated on imaging using established classifications. The relevant features are angulation, depth, and proximity to adjacent anatomy.
Wisdom Tooth (Third Molar) Impaction
Third molar impactions are classified by angulation (Winter classification): mesioangular, distoangular, horizontal, or vertical. The Pell and Gregory classification adds depth (A, B, C) and relationship to the ascending ramus (1, 2, 3). The key safety consideration before extraction is the proximity of the root tips to the inferior alveolar nerve, visible on a panoramic radiograph and definitively assessed on CBCT.
For a discussion of when wisdom tooth extraction is genuinely indicated versus when it is over-recommended, see wisdom tooth extraction: do you really need it.
Incidental Findings
A thorough X-ray read does not stop at the tooth in question. Incidental findings — pathology or anatomic variants that the patient did not present for — are routinely picked up on standard imaging, particularly panoramic views. Most are benign; some are important.
- Retained root tips: small radiopaque fragments left behind after an extraction, usually in healed bone. Often asymptomatic; intervention only if associated with infection or pain.
- Cysts: well-defined corticated radiolucencies in the jaws. Periapical, lateral periodontal, dentigerous, and odontogenic keratocyst are the major differentials based on location and relationship to teeth.
- Maxillary sinus pathology: mucosal thickening, retention cysts, sinus floor opacification visible on upper periapicals and panoramic views.
- Soft tissue calcifications: tonsilloliths, sialoliths in submandibular ducts, calcified atherosclerotic plaques in the carotid bifurcation visible on panoramic films.
- Anatomic variants: mental foramen, mandibular canal positioning, sinus septa, accessory roots — important to recognize as normal so they are not misread as pathology.
- Tori and exostoses: bony outgrowths visible as radiopaque areas overlying tooth roots.
Dental X-Ray Glossary
A short reference for the terms used in this guide and on any X-ray report you might receive.
Radiolucent: dark on an X-ray. Materials that let X-rays pass through, like soft tissue, air, and demineralized tooth structure (caries).
Radiopaque: bright on an X-ray. Materials that block X-rays, like enamel, dentin, bone, metal restorations, and gutta-percha.
PDL (periodontal ligament): the thin fibrous attachment between tooth root and bone. Appears as a thin radiolucent line around the root.
CEJ (cemento-enamel junction): the line where the enamel crown meets the cementum-covered root. The reference point for measuring bone loss.
Lamina dura: the thin radiopaque line of bone immediately adjacent to the PDL. Intact lamina dura is a sign of a healthy tooth socket.
Periapical: at the root tip. Periapical radiolucency = dark zone at the apex.
Interproximal: between two adjacent teeth.
Occlusal: on the chewing surface.
Apical: toward the root tip.
Coronal: toward the crown.
Furcation: the area between the roots of a multi-rooted tooth.
DEJ (dentinoenamel junction): the boundary between enamel and underlying dentin.
ICDAS: International Caries Detection and Assessment System — a standardized framework for staging caries depth.
PAI (Periapical Index): the standardized grading system for the severity of periapical lesions.
CBCT (Cone Beam CT): 3D X-ray imaging, used for specific indications.
FMX (Full Mouth Series): a complete intraoral X-ray series, typically 14–20 images.
The Most Common Misreads
These are the misreads we see most often in second-opinion reviews. Knowing they exist makes them easier to question if you suspect one is happening on your own imaging.
Cervical burnout misread as caries
A radiographic artifact at the neck of the tooth between the enamel margin and the bone crest can mimic an interproximal cavity. Cervical burnout is not a cavity and does not need a filling. A trained reader differentiates by location, shape, and the lack of penetration into the underlying tooth structure.
Anatomic landmarks misread as pathology
The mental foramen and the incisive foramen are normal radiolucencies on periapicals of the mandibular premolars and maxillary central incisors. They are sometimes misread as periapical lesions. The clue: the radiolucency is not centered exactly on the root apex, and the tooth is vital on testing.
Vertical root fractures missed
Most VRFs are not visible as a clear fracture line on 2D X-rays — the J-shaped bone response around the fracture is the main clue. Missed VRFs lead to repeated failed endodontic retreatment when extraction is the correct call.
Early interproximal caries overcalled or undercalled
The depth call on a small interproximal lesion is genuinely subjective. Two competent dentists may legitimately disagree on whether a lesion is in the outer enamel, the inner enamel, or the outer dentin — and that distinction often determines whether you get a filling or remineralization advice. ICDAS staging reduces the variation but does not eliminate it.
Recurrent caries hidden under restorations
The radiopaque restoration draws the eye and a subtle dark zone at the margin can be missed, especially under metal crowns where scatter obscures the area. Recurrent caries under existing work is one of the most commonly missed findings on a quick read.
Incidental findings ignored entirely
Sinus pathology, calcified carotid plaques, retained roots, and cysts away from the chief complaint are often not mentioned because the dentist is focused on the reason for the visit. A systematic read explicitly checks every region of the image regardless of why the X-ray was taken.
How to Get Copies of Your Own Dental X-Rays
You have a legal right to your dental records, including your X-rays, under HIPAA. The records are yours; the dentist is the custodian. You do not need to give a reason.
Call or email the dental office and ask for "digital copies of my most recent X-rays." Most offices will email them or provide them on a flash drive the same day.
The cost is either free or a small administrative fee. Federal HIPAA guidance caps reasonable copying fees at a level that should not deter access.
You can also ask for any treatment plans, periodontal charts, and clinical notes. All of these are part of your record.
If a practice refuses or delays beyond 30 days, you can file a complaint with the HHS Office for Civil Rights and your state dental board.
Dental X-Ray Safety and Frequency
Dental X-rays deliver a very low radiation dose. A modern digital bitewing series is roughly equivalent to one to two days of natural background radiation. The FDA and the ADA selection criteria both stress the ALARA principle — As Low As Reasonably Achievable — meaning X-rays should be taken when clinically indicated, not on a fixed calendar schedule.
Typical indications-based frequency for a low-risk adult: bitewings every 24–36 months, full series every 5+ years, panoramic only when clinically indicated. High-risk patients (active caries, periodontitis, large restorations under load) may need more frequent imaging. Routine annual full mouth series in an asymptomatic low-risk adult is over-imaging.
Pregnancy: dental X-rays with proper shielding deliver doses far below the threshold associated with any fetal harm, and the American College of Obstetricians and Gynecologists and the ADA agree they can be taken when clinically necessary during pregnancy. Routine non-urgent X-rays are commonly deferred until after delivery as a matter of caution, not necessity.
When to Get an Independent X-Ray Read
Most X-ray interpretations are routine and accurate. A second read is worth the cost when the stakes of getting it wrong are high — including the increasingly common case where your dentist used AI software to flag findings. AI tools have documented limitations that a human reader does not. We cover the five most important gaps in our guide on what AI dental X-ray tools miss.
- A treatment plan over $1,000 hinges on a single radiographic finding
- Multiple cavities, crowns, or root canals are recommended in one visit
- You have symptoms that do not match the diagnosis or do not localize where the X-ray finding is
- A new dentist found problems on the same X-ray your previous dentist did not
- A root canal is being recommended on an asymptomatic tooth — the X-ray needs to clearly support it
- An extraction is recommended and you want to be certain a tooth cannot be saved
- You suspect something was missed on a recent imaging visit
Frequently Asked Questions
Q: Can I read my own dental X-ray?
You can absolutely learn to recognize the basics — the types of X-rays, the major anatomic landmarks, what a cavity, bone loss, or periapical lesion looks like. That is what this guide is for. You will not replace a trained reader, but you can ask better questions and understand what your dentist is pointing at. For high-stakes decisions, an independent expert read remains the right move.
Q: What is the difference between a bitewing and a periapical X-ray?
A bitewing captures the crowns of upper and lower posterior teeth in one image — used mainly for caries detection and crestal bone screening. A periapical shows the entire tooth from crown to root tip — used when the root or the periapex needs to be evaluated. Most check-ups include both.
Q: What does a cavity look like on an X-ray?
A dark (radiolucent) zone in the tooth. Interproximal cavities are triangular dark zones between adjacent teeth. Occlusal cavities are radiolucent shadows under the chewing surface. Recurrent cavities are dark zones at the margin of an existing filling or crown. Depth determines whether the cavity warrants a filling.
Q: How can I tell if my dentist missed something on my X-ray?
Common missed findings include vertical root fractures, recurrent caries under existing restorations, subtle periapical changes, and incidental findings outside the chief complaint area. The most reliable way to find out is to have a second dentist read the imaging systematically. Our dental X-ray review service flags any finding present on the imaging but not in your dentist's original diagnosis.
Q: How often should I have dental X-rays taken?
The ADA recommends imaging by clinical indication rather than fixed calendar interval. For a low-risk adult with no active disease, bitewings every 24–36 months and a full series every 5+ years is typical. High-risk patients need more frequent imaging.
Q: Are dental X-rays safe?
Yes, at standard frequencies. The radiation dose from a modern digital bitewing series is roughly equivalent to one to two days of natural background radiation, far below any threshold associated with harm. The principle is ALARA — As Low As Reasonably Achievable — meaning X-rays should be taken when clinically indicated.
Q: Can I refuse a dental X-ray?
Yes — you can refuse any medical procedure, including X-rays. A dentist may decline to provide certain treatments without current imaging if they cannot diagnose safely without it. For routine cleanings on a low-risk patient with recent prior imaging, declining new X-rays for that visit is a reasonable conversation to have.
Q: What is the difference between an X-ray and a CBCT?
A conventional X-ray is a 2D image. A CBCT is a 3D volume — many cross-sectional slices that can be reformatted in any plane. CBCT has higher radiation dose and is reserved for specific indications (implants, suspected root fractures, complex endodontic anatomy, impacted teeth near critical anatomy). It is not a routine screening tool.
Image Credits
Radiographic examples in this guide are reproduced from Wikimedia Commons under their original Creative Commons or public-domain licenses.
- Panoramic X-ray: Basic panoramic radiograph by Coronation Dental Specialty Group, via Wikimedia Commons (CC BY 3.0).
- CBCT scan: CBCT image 02 by Panda 51, via Wikimedia Commons (CC BY-SA 4.0).
- Periapical bone loss: Bone loss in periapical xray by Shaimaa Abdellatif, via Wikimedia Commons (CC BY-SA 4.0).
- Periapical radiolucency: Periapical radiolucency by Shaimaa Abdellatif, via Wikimedia Commons (CC BY-SA 4.0).
- Periapical abscess: Abscessed tooth periapical radiograph by Coronation Dental Specialty Group, via Wikimedia Commons (CC BY-SA 3.0).
- Chronic apical periodontitis: Chronic apical periodontitis by Michele Gardini, via Wikimedia Commons (CC BY-SA 3.0).
- Root resorption: Root resorption by Dentlavkesh, via Wikimedia Commons (public domain).
- Impacted wisdom tooth: Radiograph of impacted wisdom tooth near nerve by Coronation Dental Specialty Group, via Wikimedia Commons (CC BY-SA 3.0).
Images used here are educational examples illustrating typical radiographic appearances — they do not depict toothcheck patients.